Trade Service Setup
Learn how to integrate Trade Service APIs
The Okto Trade Service provides a comprehensive API suite for executing token swaps across multiple blockchain networks. This guide walks through the setup process and explains the correct order of API execution for successful swaps.
Trade Service Template Repository
Explore the Okto Trade Service Template for a comprehensive guide on integrating Trade Service APIs into your application. Please note that this template is for development and testing purposes only. Be sure to customize and secure it before using in production.
Prerequisites
-
To access the Trade Service APIs, requests must be authenticated using an API key. Please contact the Okto team at
[email protected]to request your Trade Service API credentials. -
Okto's Trade Service only supports mainnets. For more information on the chains and tokens supported by the Trade Service, check Supported Chains and Tokens documentation.
Core API Functions
The entire swap process revolves around these core API calls. Their usage varies depending on the swap scenario.
Get Quote(Optional): Provides a quick price estimate for a swap. This is the fastest call and is used for display purposes only.Get Best Route: Calculates the most optimal path for a swap, returning the initial transaction structure.Get Call Data: Provides the complete, detailed transaction data required for signing and execution.Register Intent: Registers a signed cross-chain swap intent with the Okto ULL for fulfillment.Get Order Details: Tracks the final status of a swap after it has been executed or registered.
Setup Guide
Same-Chain Swap
Swap is an atomic operation where you send tokens to us and we send back requested tokens.
Same-chain swaps are executed entirely within same blockchain, making them simpler and most of the times faster than cross-chain operations.
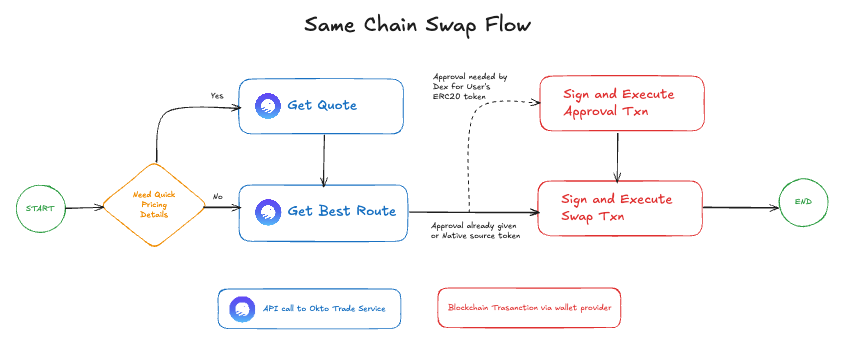
Step 1: Get Quote (Optional)
The getQuote API returns a real-time estimate of the swap's outcome for quick pricing details. It helps determine how much of the destination token the user will receive for a given amount of the source token.
Step 2: Get Best Route
The getBestRoute API finds the most optimal route for the swap and returns the necessary transaction steps in an array. The response will contain pricing, the best route, and an array of transaction objects.
A. With Approval: If the user has not previously approved the DEX/aggregator to spend their source token, the response will include two transaction steps.
- Approval Transaction: The user must sign and execute this first.
- Swap Transaction: After the approval is confirmed, the user signs and executes this second transaction.
B. Without Approval: If approval has already been granted or the token is native, the response will contain only a single swap transaction.
Both getBestRoute and getCallData APIs return transaction steps with a defined format:
{
  "type": "transaction",
  "metadata": {
    "serviceType": "bridge",
    "transactionType": "dex",
    "protocol": "BASE_UNISWAP_V4",
    "aggregatorName": "1InchV6"
  },
  "chainId": "eip155:8453",
  "txnData": { /* Transaction data */ }
}type: Can be either "transaction" or "api"
- "transaction" means the user must sign and execute it in the specified order
- "api" means the step will be handled via API calls
metadata: Contains serviceType, transactionType, protocol, and aggregatorName
serviceType: Always "bridge" for cross-chain operations, "Swap" for same-chaintransactionType: Can be "approval", "init", "dex", etc.protocol: The actual DEX used for the swapaggregatorName: Same as protocol if DEX is used directly, or the aggregator name if accessed via an aggregator (e.g., Protocol: "Uniswap", Aggregator: "1Inch")
Step 3: Sign and Execute
The user signs and executes the transaction(s) from the getBestRoute response using their wallet. No further API calls are needed.
For same-chain swaps, Okto only provides the the transaction payload. No Okto jobId or orderId is created. The execution occurs directly between the user's wallet and the on-chain DEX/aggregator. To check the status of the swap, monitor the transaction hash received after execution via a blockchain explorer or the user's wallet provider. You can read more about transaction here: https://ethereum.org/en/developers/docs/transactions/
Cross-Chain Swap
Cross-chain swaps involve transferring tokens between different blockchains using Okto's Unified Liquidity Layer (ULL). These swaps are handled differently based on whether the source token is a Filler-Supported Token (FST). This distinction determines the entire execution flow.
FST vs. Non-FST
- FST: A token directly supported by Okto's ULL for cross-chain bridging. This flow uses
registerIntent. - Non-FST: Any token that is not an FST. On a high level, Non-FST tokens must first be swapped to an FST-supported token and then executed directly. In this process, the system directly sends the transaction to an Okto contract to initiate the swap. Hence,
registerIntentis not required. - Check out Supported Chains and FSTs for the list of supported FSTs.
Cross-Chain Swap (FST)
Since the source token is already FST-supported, cross-chain intent can be registered directly with ULL for fulfillment.

Step 1: Get Quote (Optional)
The getQuote API returns a real-time estimate of the swap's outcome for quick pricing details. It helps determine how much of the destination token the user will receive for a given amount of the source token.
Step 2: Get Best Route
The getBestRoute API returns pricing, the optimal route, and the initial transaction structure. The response type will be api and will contain a permitDataToSign object that must be signed.
Action Required: Sign Permit2 Data
The getBestRoute response includes a permitDataToSign parameter, which must be signed by the user's wallet (e.g., using signTypedData). This signature authorizes Okto to transfer tokens on the user's behalf using the EIP-2612 Permit2 standard.
What is Permit2? Permit2 allows a third party to transfer tokens on behalf of a user without requiring an on-chain approval transaction each time. The user registers the token once on the Permit2 contract for that chain. After registration, the user can generate off-chain signatures for future transfers, which third parties can submit to Permit2 to execute token movements.
For more details, see the official Permit2 documentation.
Both getBestRoute and getCallData APIs return transaction steps with a defined format:
{
  "type": "transaction",
  "metadata": {
    "serviceType": "bridge",
    "transactionType": "dex",
    "protocol": "BASE_UNISWAP_V4",
    "aggregatorName": "1InchV6"
  },
  "chainId": "eip155:8453",
  "txnData": { /* Transaction data */ }
}type: Can be either "transaction" or "api"
- "transaction" means the user must sign and execute it in the specified order
- "api" means the step will be handled via API calls
metadata: Contains serviceType, transactionType, protocol, and aggregatorName
serviceType: Always "bridge" for cross-chain operations, "Swap" for same-chaintransactionType: Can be "approval", "init", "dex", etc.protocol: The actual DEX used for the swapaggregatorName: Same as protocol if DEX is used directly, or the aggregator name if accessed via an aggregator (e.g., Protocol: "Uniswap", Aggregator: "1Inch")
Sign Permit Data: Take the permitDataToSign parameter from the response payload and sign it using the user's wallet provider.
Approval Transaction
If the user's wallet has not previously authorized the Permit2 contract for the source token on the source chain, the getBestRoute response may also include an approval transaction step. This transaction must be signed and executed after getCallData and before registerIntent.
Step 3: Get Call Data
After obtaining the best route, call the getCallData API to get the detailed call data for the swap. Pass the permitSignature (the signature of the permitDataToSign object) in the request.
Step 4: Register Intent
Call the registerIntent API, passing the intentCalldata (as orderBytes) and the signed orderTypedData (as orderBytesSignature). This registers the swap intent with the ULL. The response will contain an order ID.
Step 5: Get Order Details
The data field in the registerIntent response is the Okto jobId (or orderId). Poll the getOrderDetails API with this jobId until a terminal status like success or failure is received.
Understanding Order Status
The orderData.status field in the response indicates your order’s current state:
| Status Code | Description |
|---|---|
-1 | Order expired. The order did not register on-chain. Terminal state. |
0 | Order received by the backend but not yet registered on-chain. |
1 | Order registered on-chain but not yet filled. |
2 | Order settled successfully. Terminal state. |
3 | Order in dispute. The order was filled but not yet settled. |
4 | Order refunded. The order was not filled, and user was refunded. Terminal state. |
Cross-Chain Swap (Non-FST)
This flow is used when the source token is not an FST. It requires swapping the token to an FST on the source chain before bridging. This is achieved by executing a transaction directly with an Okto contract, bypassing the separate registerIntent step.
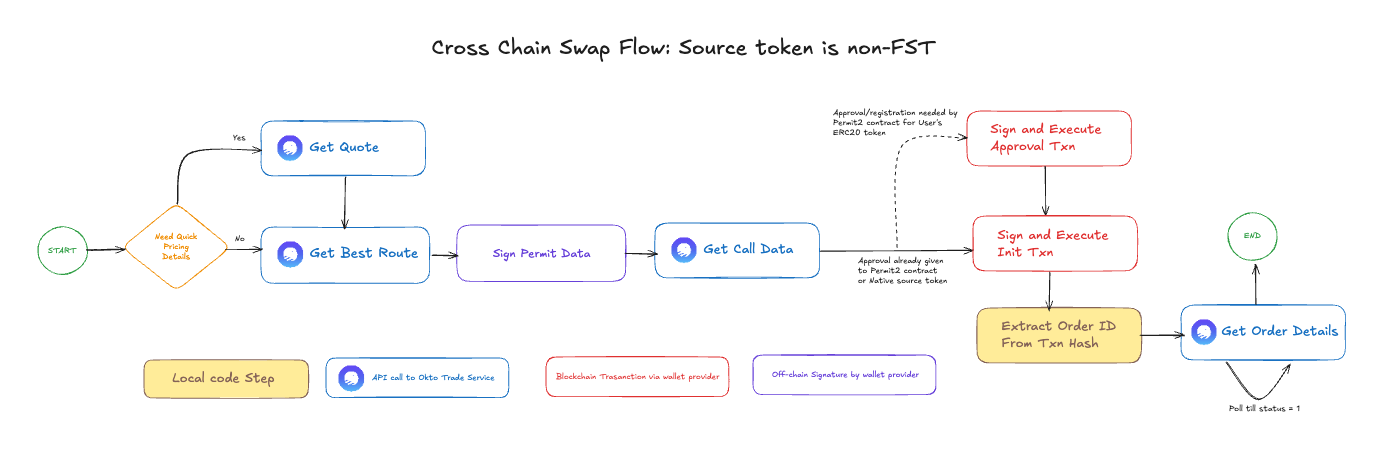
Step 1: Get Quote (Optional)
The getQuote API returns a real-time estimate of the swap's outcome for quick pricing details. It helps determine how much of the destination token the user will receive for a given amount of the source token.
Step 2: Get Best Route
The getBestRoute API returns pricing, the optimal route, and the initial transaction structure. The response will contain an array of steps with type: "transaction". For non-native (ERC20) tokens, this response also includes permitDataToSign, which must be signed before proceeding.
Both getBestRoute and getCallData APIs return transaction steps with a defined format:
{
  "type": "transaction",
  "metadata": {
    "serviceType": "bridge",
    "transactionType": "dex",
    "protocol": "BASE_UNISWAP_V4",
    "aggregatorName": "1InchV6"
  },
  "chainId": "eip155:8453",
  "txnData": { /* Transaction data */ }
}type: Can be either "transaction" or "api"
- "transaction" means the user must sign and execute it in the specified order
- "api" means the step will be handled via API calls
metadata: Contains serviceType, transactionType, protocol, and aggregatorName
serviceType: Always "bridge" for cross-chain operations, "Swap" for same-chaintransactionType: Can be "approval", "init", "dex", etc.protocol: The actual DEX used for the swapaggregatorName: Same as protocol if DEX is used directly, or the aggregator name if accessed via an aggregator (e.g., Protocol: "Uniswap", Aggregator: "1Inch")
Action Required: Sign Permit2 Data
The getBestRoute response includes a permitDataToSign parameter, which must be signed by the user's wallet (e.g., using signTypedData). This signature authorizes Okto to transfer tokens on the user's behalf using the EIP-2612 Permit2 standard.
Sign Permit Data: Take the permitDataToSign parameter from the response payload and sign it using the user's wallet provider.
Approval Transaction
If the user's wallet has not previously authorized the Permit2 contract for the source token on the source chain, the getBestRoute response may also include an approval transaction step. This transaction must be signed and executed after getCallData and before registerIntent.
Step 3: Get Call Data
After obtaining the best route, call the getCallData API to get the detailed call data for the swap. For non-native tokens, pass the permitSignature (the signature of the permitDataToSign object) in the request.
Step 4: Sign and Execute
The user signs and executes the transaction(s) from the getCallData response in the specified order.
- Approval Transaction (if present): Sign and execute the
approvaltransaction first. - Init Transaction: Once the approval is confirmed (or if it was not needed), sign and execute the
inittransaction.
When the user signs and executes the init transaction, a transaction hash will be returned. This hash can be used to extract the order ID for tracking purposes.
Step 5: Extract Order ID from Transaction Receipt
After the init transaction is confirmed, use the transaction hash to retrieve the receipt. The order ID can then be extracted from the emitted logs.
The init transaction emits an OrderInitiated event containing the order ID. Here's how to extract it:
- Get Transaction Receipt: Use the transaction hash with
publicClient.waitForTransactionReceipt()or an equivalent method. - Find OrderInitiated Event: Look for the event with the specific topic hash
- Extract Order ID: The order ID is encoded in the first 32 bytes (i.e., the first 64 hex characters) of the
datafield.
For a sample implementation of extracting the order ID from the transaction receipt, refer to the extractOrderId utility script.
Step 6: Get Order Details
Use the extracted order ID to poll the getOrderDetails API until a terminal status like success or failure is received.
Understanding Order Status
The orderData.status field in the response indicates your order’s current state:
| Status Code | Description |
|---|---|
-1 | Order expired. The order did not register on-chain. Terminal state. |
0 | Order received by the backend but not yet registered on-chain. |
1 | Order registered on-chain but not yet filled. |
2 | Order settled successfully. Terminal state. |
3 | Order in dispute. The order was filled but not yet settled. |
4 | Order refunded. The order was not filled, and user was refunded. Terminal state. |
Debugging and Error Handling
For a comprehensive list of potential errors, their meanings, and troubleshooting steps, please refer to our dedicated Error Codes documentation.